Guest Notification Settings
The Guest Notification Settings in the LIKE MAGIC Operations Platform let you control which automated notifications your guests receive, when they are sent, through which channels they go out, and which sender identity they arrive with. This article explains the key concepts and guides you through the configuration step by step, so your guest communication runs exactly the way you want it to.
1. Who Can Use This Feature?
👤 Access to the Guest Notification settings depends on the role of your staff user account:
- Property Admin: can view and edit the settings for their assigned Properties.
- Account Administrator: can view and edit the general settings, the sender identity and the channels at Account level. Individual notifications and their timing are configured on the Property page.
- Property Viewer and Account Viewer: have read-only access. They can open the settings, but all fields are locked.
⚙️ You find the settings in the Operations Platform under Settings → Guest Journey → Guest Notification.
A few technical fields (the channel linking for Email, SMS and WhatsApp, and the WhatsApp template details) are managed by the LIKE MAGIC team. You do not need to configure them yourself. If a change is needed there, request it via a Support Ticket.
Where the page appears: the Guest Notification page exists twice, once for the Account (Settings → Account → Guest Notification) and once for the selected Property (Settings → Guest Journey → Guest Notification). If you work at Account level with several Properties, switch to a specific Property to see the Property page.
2. Feature Overview
Guest Notifications are automated messages that LIKE MAGIC sends to your guests along the Digital Guest Journey, from the booking confirmation to the check-out follow-up. The Guest Notification settings control whether, when, through which channel and with which sender identity these messages go out. The message content itself is managed separately (see below).
a) Two Tables of Notifications
Below the general settings, the page lists every notification in two separate tables, and the table a notification sits in decides what you can configure on it:
- Event Based Notifications are triggered by something that happens. There is nothing to schedule, so the table shows only Notification Template, Enabled and WhatsApp Template.
- Time Based Notifications are sent at a scheduled moment relative to arrival or departure. The table adds a Times column, and each row offers the timing fields described under Adjust the Timing of Time-Based Notifications.
ℹ️ Both tables exist on the Property page only. The Account page carries the general settings, the sender identity and the WhatsApp templates, so the individual toggles and all timing are always set per Property.
Event Based Notifications
| Notification | Sent when |
|---|---|
| Booking Created and Reservation Created | A booking or a reservation is created. These are the confirmation messages that invite bookers and guests to the Pre-Check-In Flow. ℹ️ The two always switch on and off together. |
| Companion Added | A travel companion is added to a reservation |
| Checked In | The guest is checked in |
| Room Check-In Ready | The Unit is ready for the guest to move in. It has a time trigger internally, but nothing for you to schedule, so it sits in this table. |
| Reservation Canceled | A reservation is cancelled |
| Invoice and Invoice Billing | The invoice is issued. ℹ️ These two always switch on and off together. |
| ID Check Declined | An identity check is declined |
| Resend Guest Flow Link | A guest requests their Guest Journey link again |
| Marketing Consent | Marketing consent is requested from the guest |
| Approval Service Approved and Approval Service Declined | Your team decides on a service that needs approval |
| Newsletter 1, Newsletter 2 and Newsletter 3 | Nothing on this page sends these. They are placeholders for one-off sends that LIKE MAGIC runs on request, so there is nothing to configure on them. |
⚠️ The last five rows have greyed-out Enabled toggles and cannot be switched off. The first four of them are essential for guests to complete their journey; the newsletters have no automatic trigger at all.
Time Based Notifications
Each of these is sent relative to arrival or departure. The defaults:
| Notification | Purpose | Default timing |
|---|---|---|
| Booking Reminder | Reminds the booker to complete the Pre-Check-In Flow | 7 days before arrival |
| Pre-Check-In Reminder | Invites guests to the Pre-Check-In Flow when the reservation was booked far in advance | Midpoint between booking and arrival, for reservations created far enough in advance (default 30 days) |
| Check-In Introduction | Prepares guests for their arrival | 2 days before arrival |
| Check-In Reminder | Final reminder to complete the check-in | On the day of arrival |
| Check-In | Check-in day message | On the day of arrival |
| Check-Out Introduction | Explains the check-out to guests on longer stays | 1 day before departure, for stays of 3 or more nights |
| Check-Out Alert | Reminds guests shortly before check-out time | 30 minutes before departure |
| Check-Out Follow-up | Thanks guests after their stay, e.g. with the invoice or a review request | 1 day after departure |
| Box Rental Expiry Reminder | Warns the guest before a rented box expires. ℹ️ This notification exists only on Properties running on Apaleo that have a box device set up, see Box Rental & Box Shop. | No default, you set the minutes before expiry |
b) Available Channels
Guest Notifications can be delivered over three channels, once the channel is set up:
- SMS
c) Where the Message Content Lives
⚠️ The Guest Notification settings control the sending behaviour, not the message texts. The content is managed separately:
- Email and SMS content is maintained in Prismic, the Content Management System.
- WhatsApp messages use pre-approved templates. The templates are listed on the Account page of the Guest Notification settings. Setting them up and linking them is done by LIKE MAGIC, so request additions or changes via a Support Ticket. Channel connection (Email, SMS, WhatsApp) is set up under Messaging Channels.
d) Scope (Multiproperty)
🧩 The General Settings (master switch and channels) and the channel settings follow the Account value until a Property overrides them. The page shows the value in effect, so a Property that has never been edited shows the Account's; once you save on a Property, that Property keeps its own value. The sender identity is stored on the level you are editing, so set it for each Property that sends under its own identity.
3. Configure Guest Notifications
a) Open the Guest Notification Settings
- Open the Operations Platform.
- In the Sidebar, go to Settings.
- Open the section Guest Journey and select Guest Notification.
b) Set Up Sender Identity and Channels
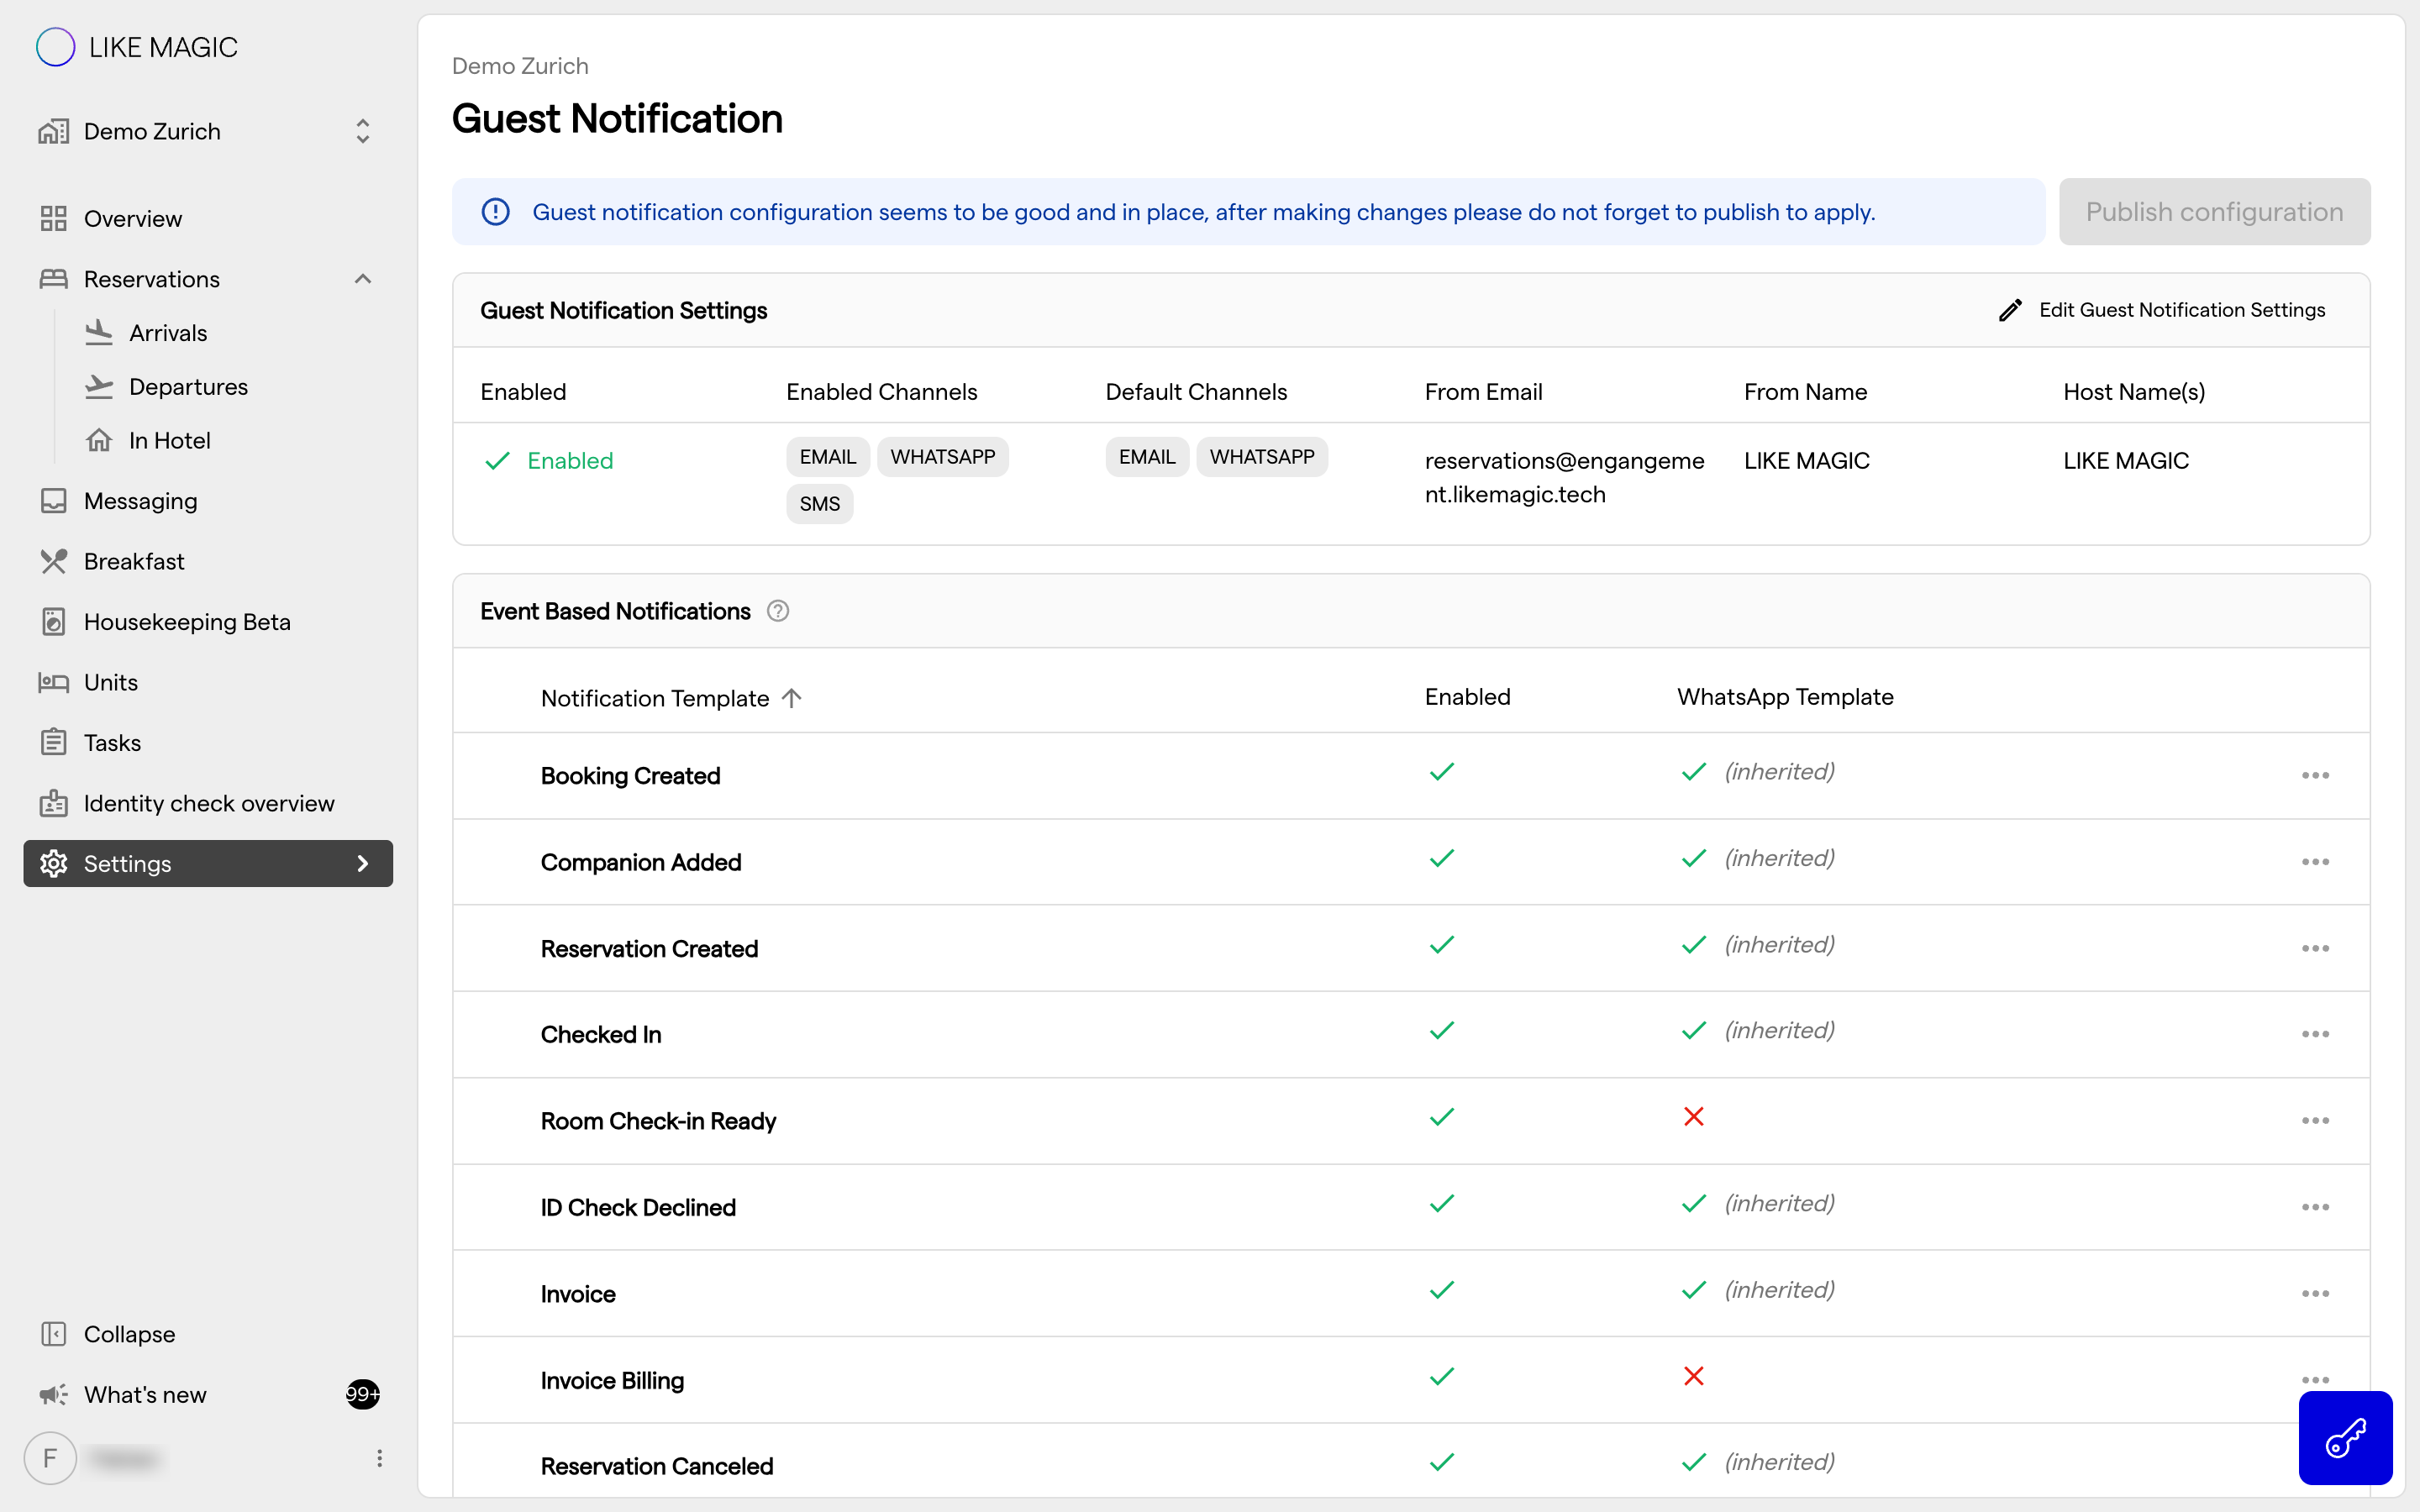
Open the general settings of the page. Here you define the master switch, the sender identity and the channels:
| Setting | What it does |
|---|---|
| Guest Notifications Enabled | The master switch. Enable or disable notifications to your guests for this Property. If this is off, no Guest Notifications are sent at all. |
| From Email | The email address that appears as the sender of your emails. |
| From Name | The name your guests see in the "From" line of the email. This controls how your messages are identified in the guest's inbox. |
| Host Name(s) | The host name(s) used for notifications. This name appears inside the message, below the greeting, and only if the message template in Prismic uses the corresponding variable. |
| Reply-To Email | The email address guests can reply to. ℹ️ This field is not available for Properties using Apaleo as their PMS. |
| Enabled Channels | The channels that are switched on for this Property. Think of this as the master switch per channel: if a channel is not activated here, no message is ever sent through it. |
| Default Channels | The channels used when a guest has not chosen a preferred channel. For guests who have expressed a preference (e.g. through their Guest Profile), that preference is used instead. |
⚠️ From Name vs. Host Name(s): the sender name your guests see in their email inbox is controlled by From Name. Host Name(s) never changes the sender. It is only a personal touch inside the message body, for example to introduce your front-desk team by name.
How LIKE MAGIC picks the channel for each guest:
- If the guest has chosen a preferred channel (e.g. in their Guest Profile or during the Pre-Check-In Flow), that channel is used.
- If the guest has no preference, the Default Channels are used.
- In both cases, only channels that are part of the Enabled Channels are ever used.
We recommend enabling both Email and WhatsApp as default channels. When a guest hasn't set a preferred communication channel themselves, the default channels determine how they're first contacted. Relying on email alone means many guests never see (or never open) their pre-arrival messages, so they never start the online check-in.
Insights: By sending on both channels, you meet guests where they already are: WhatsApp open rates typically sit well above 90%, compared to roughly 20% for email. In practice, this has a direct impact on adoption. One of our hotel groups moved from 14% to 57% guest journey adoption after switching from an email-only default to Email + WhatsApp (alongside enabling Booking.com messaging). Higher adoption means more completed pre-check-ins, fewer front-desk queues, and a smoother arrival for the guest.
Note: guests can always override the default and pick their own preferred channel during the journey, enabling both simply ensures they're reached in the meantime.
c) Enable or Disable Individual Notifications
Every row in both tables carries an Enabled toggle:
- Click on the notification you want to change.
- Switch the Enabled toggle on or off.
- Save your change.
Remember the coupled pairs: switching Booking Created also switches Reservation Created (and vice versa), and switching Invoice also switches Invoice Billing (and vice versa). Notifications that are implicitly always enabled show a greyed-out toggle and cannot be changed.
d) Adjust the Timing of Time-Based Notifications
Rows in the Time Based Notifications table offer additional timing fields, depending on the notification. Rows in the Event Based Notifications table have none, because the event itself decides the moment. The most common fields:
- Arrival in days: how many days before arrival the notification is sent.
- Departure in days and Departure after days: timing relative to the departure date.
- Departure in less than X minutes: used for the Check-Out Alert shortly before check-out.
- Reservation stay greater or equal then nights: limits a notification to longer stays (e.g. the Check-Out Introduction).
- Notification Trigger Time(s) and Days of Week: define at which times of day and on which weekdays the notification may go out.
We recommend starting with the default values and adjusting them only after you have observed how your guests respond.
e) Vary a Notification by Guest Segment
A notification can be varied per published segment rule of the Property (see Guest Segmentation). Open the row menu of the notification and choose Add Segment Variant: the segment then gets its own row, indented under the notification.
| What you want for a segment | What you do | What the row looks like |
|---|---|---|
| Nothing different | Nothing. A segment without a row follows the notification itself. | No row |
| Its own schedule | Add Segment Variant, leave the switch on, set the timing | A row with a tick under Enabled |
| No message at all | Add Segment Variant, switch it off | A row with a cross under Enabled |
To let a segment follow the notification again, open the row menu of its entry and choose Delete. The segment falls back to the default entry, including its WhatsApp wording.
ℹ️ Segment rows exist in both tables of the page. In Time Based Notifications a segment can get its own timing. In Event Based Notifications the event itself decides the moment, so a segment row there only decides whether the notification goes out to that segment at all.
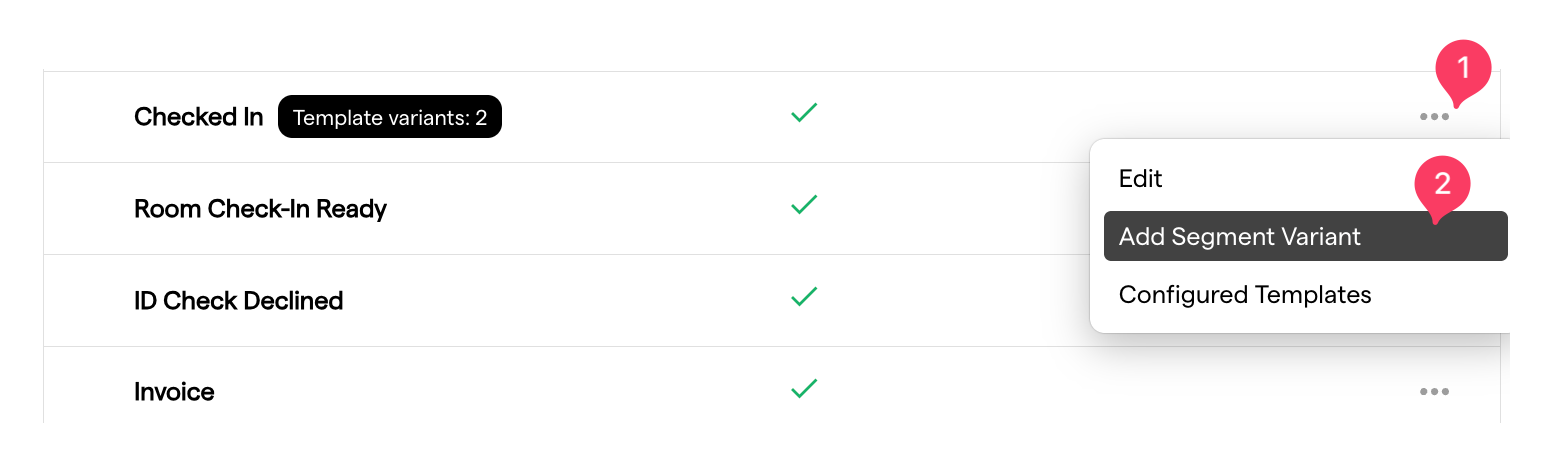
Clicking the Template variants chip on a notification row opens the Configured Templates overview, which shows the text every segment actually receives.

ℹ️ Guest Segmentation is in beta and is switched on by LIKE MAGIC, so Add Segment Variant stays hidden until your Account has it. It appears on the Property page, and only once at least one segment rule is published. Segment rules are written per Property, so the Account page carries no segment rows.
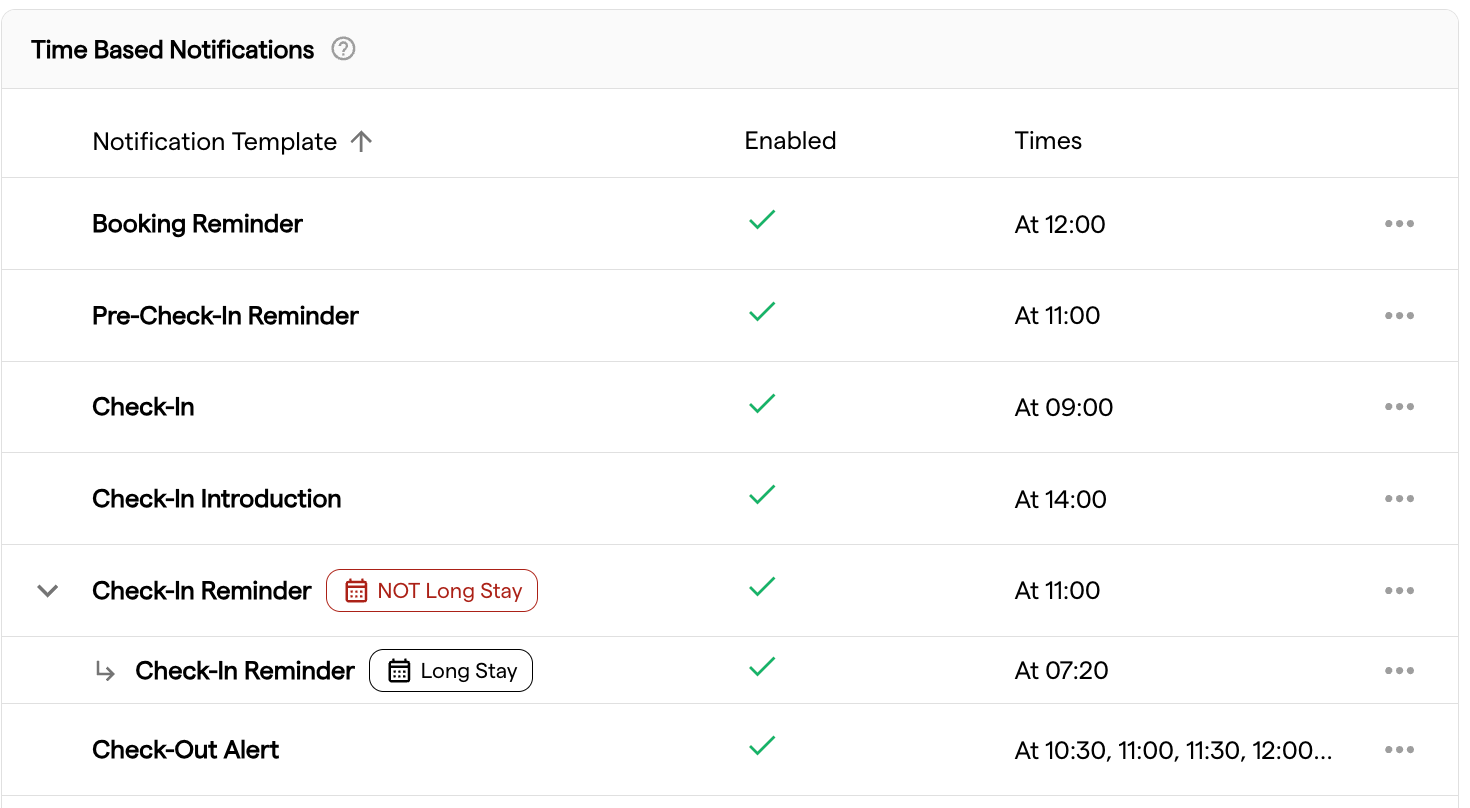
⚠️ A segment row changes the timing, and whether the notification goes out at all. It does not change the wording. A different wording for a segment is a separate text in Prismic, carrying the segment code in its Segment field. While a notification is switched off as a whole, a segment switched off is not stored, and the segment follows the default again once you re-enable the notification.
f) Validate and Publish Your Changes
Your changes are not live immediately. The page follows a safe two-step flow:
- As soon as you edit something, the configuration is validated automatically. Any conflicts (for example an empty From Email while notifications are enabled, or a Default Channel that is not part of the Enabled Channels) are displayed directly on the page.
- ✅ When no conflicts remain, the configuration is ready. Click Publish configuration to make your changes live.
As long as at least one conflict exists, publishing is blocked and nothing is saved. Resolve all conflicts first.
4. FAQs
Why can I not disable certain notifications?
Some notifications are essential for guests to complete their journey: for example receiving their Guest Journey link again or ID check results. These are always active and their toggles are greyed out.
Where do I change the text of a notification?
Not in the Guest Notification Settings. Email and SMS content is managed in Prismic, WhatsApp content via pre-approved templates set up with the LIKE MAGIC team.
Why can I not add a segment variant?
Either you are on the Account page, where segment rows never appear, or the Property has no published segment rule yet. See Guest Segmentation.
Why do I not see the Reply-To Email field?
The field is not available for Properties using Apaleo as their PMS.
What is the difference between Enabled Channels and Default Channels?
Enabled Channels is the hard master switch. A channel not listed there is never used. Default Channels is the fallback that only applies when a guest has not chosen a preferred channel. Every Default Channel must also be an Enabled Channel.
Do my settings apply to all Properties of my Account?
The General Settings and channel settings you set at Account level apply to every Property that does not override them. An override applies to that Property alone, and the sender identity is stored on the level you edit.
5. Conclusion
With the Guest Notification settings you decide which automated messages reach your guests, when, and through which channel, under a sender identity your guests recognize. Start with the master switch and the sender fields, define your channels, fine-tune the individual notifications, and let the built-in validation guide you to publishing.
📝 Related articles:
- Learn which messages accompany your guests along the journey in the article Automated Guest Notifications.
- To prevent notifications from being sent to specific addresses, see Guest Notification Filter Configuration.
- To connect the channels these notifications go out on (WhatsApp, SMS and the email relay), see Messaging Channels.
- To give a group of guests their own timing, their own wording, or no message at all, see Guest Segmentation.