Reservation Alerts
Introduction
Reservation alerts are messages for hotel staff that display as notifications when a reservation is accessed at specific points in its lifecycle. They help communicate important information to staff at critical moments during a guest's stay.
1. Feature Overview
Alerts can appear as pop-up modals or notification banners, depending on the Display Alert as Pop-Up setting (see section 8).
Alerts are filtered based on the Area setting and the current state of the reservation, so staff only see relevant alerts at the right time.
2. Alert Areas
The Area field determines when an alert will be displayed to staff. Choose the area that best matches when you need staff to see the alert.
| Area | When Alert Appears |
|---|---|
| Reservation | Visible on every tab except Billing |
| Check-In | On the day of arrival, and in the Check-In Wizard |
| In-house | Always visible while the guest is in house |
| Check-Out | On the day of departure |
| Billing | Only when viewing the Billing tab. Selectable only on properties where that tab is enabled |
Example scenarios:
- Use Check-In for "Guest requested late arrival, arriving after 10pm"
- Use In-house for "Guest is celebrating anniversary, complimentary champagne arranged"
- Use Check-Out for "Guest has items in safe deposit box"
- Use Billing for "Corporate billing, send invoice to company address"
- Use Reservation for general notes that should always be visible
3. Where Alerts are displayed
Overview tab: Alerts widget
The Alerts widget on the Overview tab shows up to three alerts, an Add Alert button and a link to the full Alerts tab.
Reservation Details Page
Alerts appear as notification banners at the top of the reservation detail drawer, filtered by the current reservation state and the selected tab. The banners sit in the same block as the reservation condition notifications, so they appear only where the Condition feature is included in your pricing.
Check-in Wizard
In the Check-In Wizard, alerts with the Check-In area are displayed at the top, so staff see them before they complete the check-in.
If Display Alert as Pop-Up is enabled for a Check-In alert, the modal appears automatically when staff open the Check-In Wizard.
Billing Tab
When viewing the Billing tab, only alerts with the Billing area are shown. This keeps billing-specific notes separate from general reservation alerts.
4. Accessing Alerts
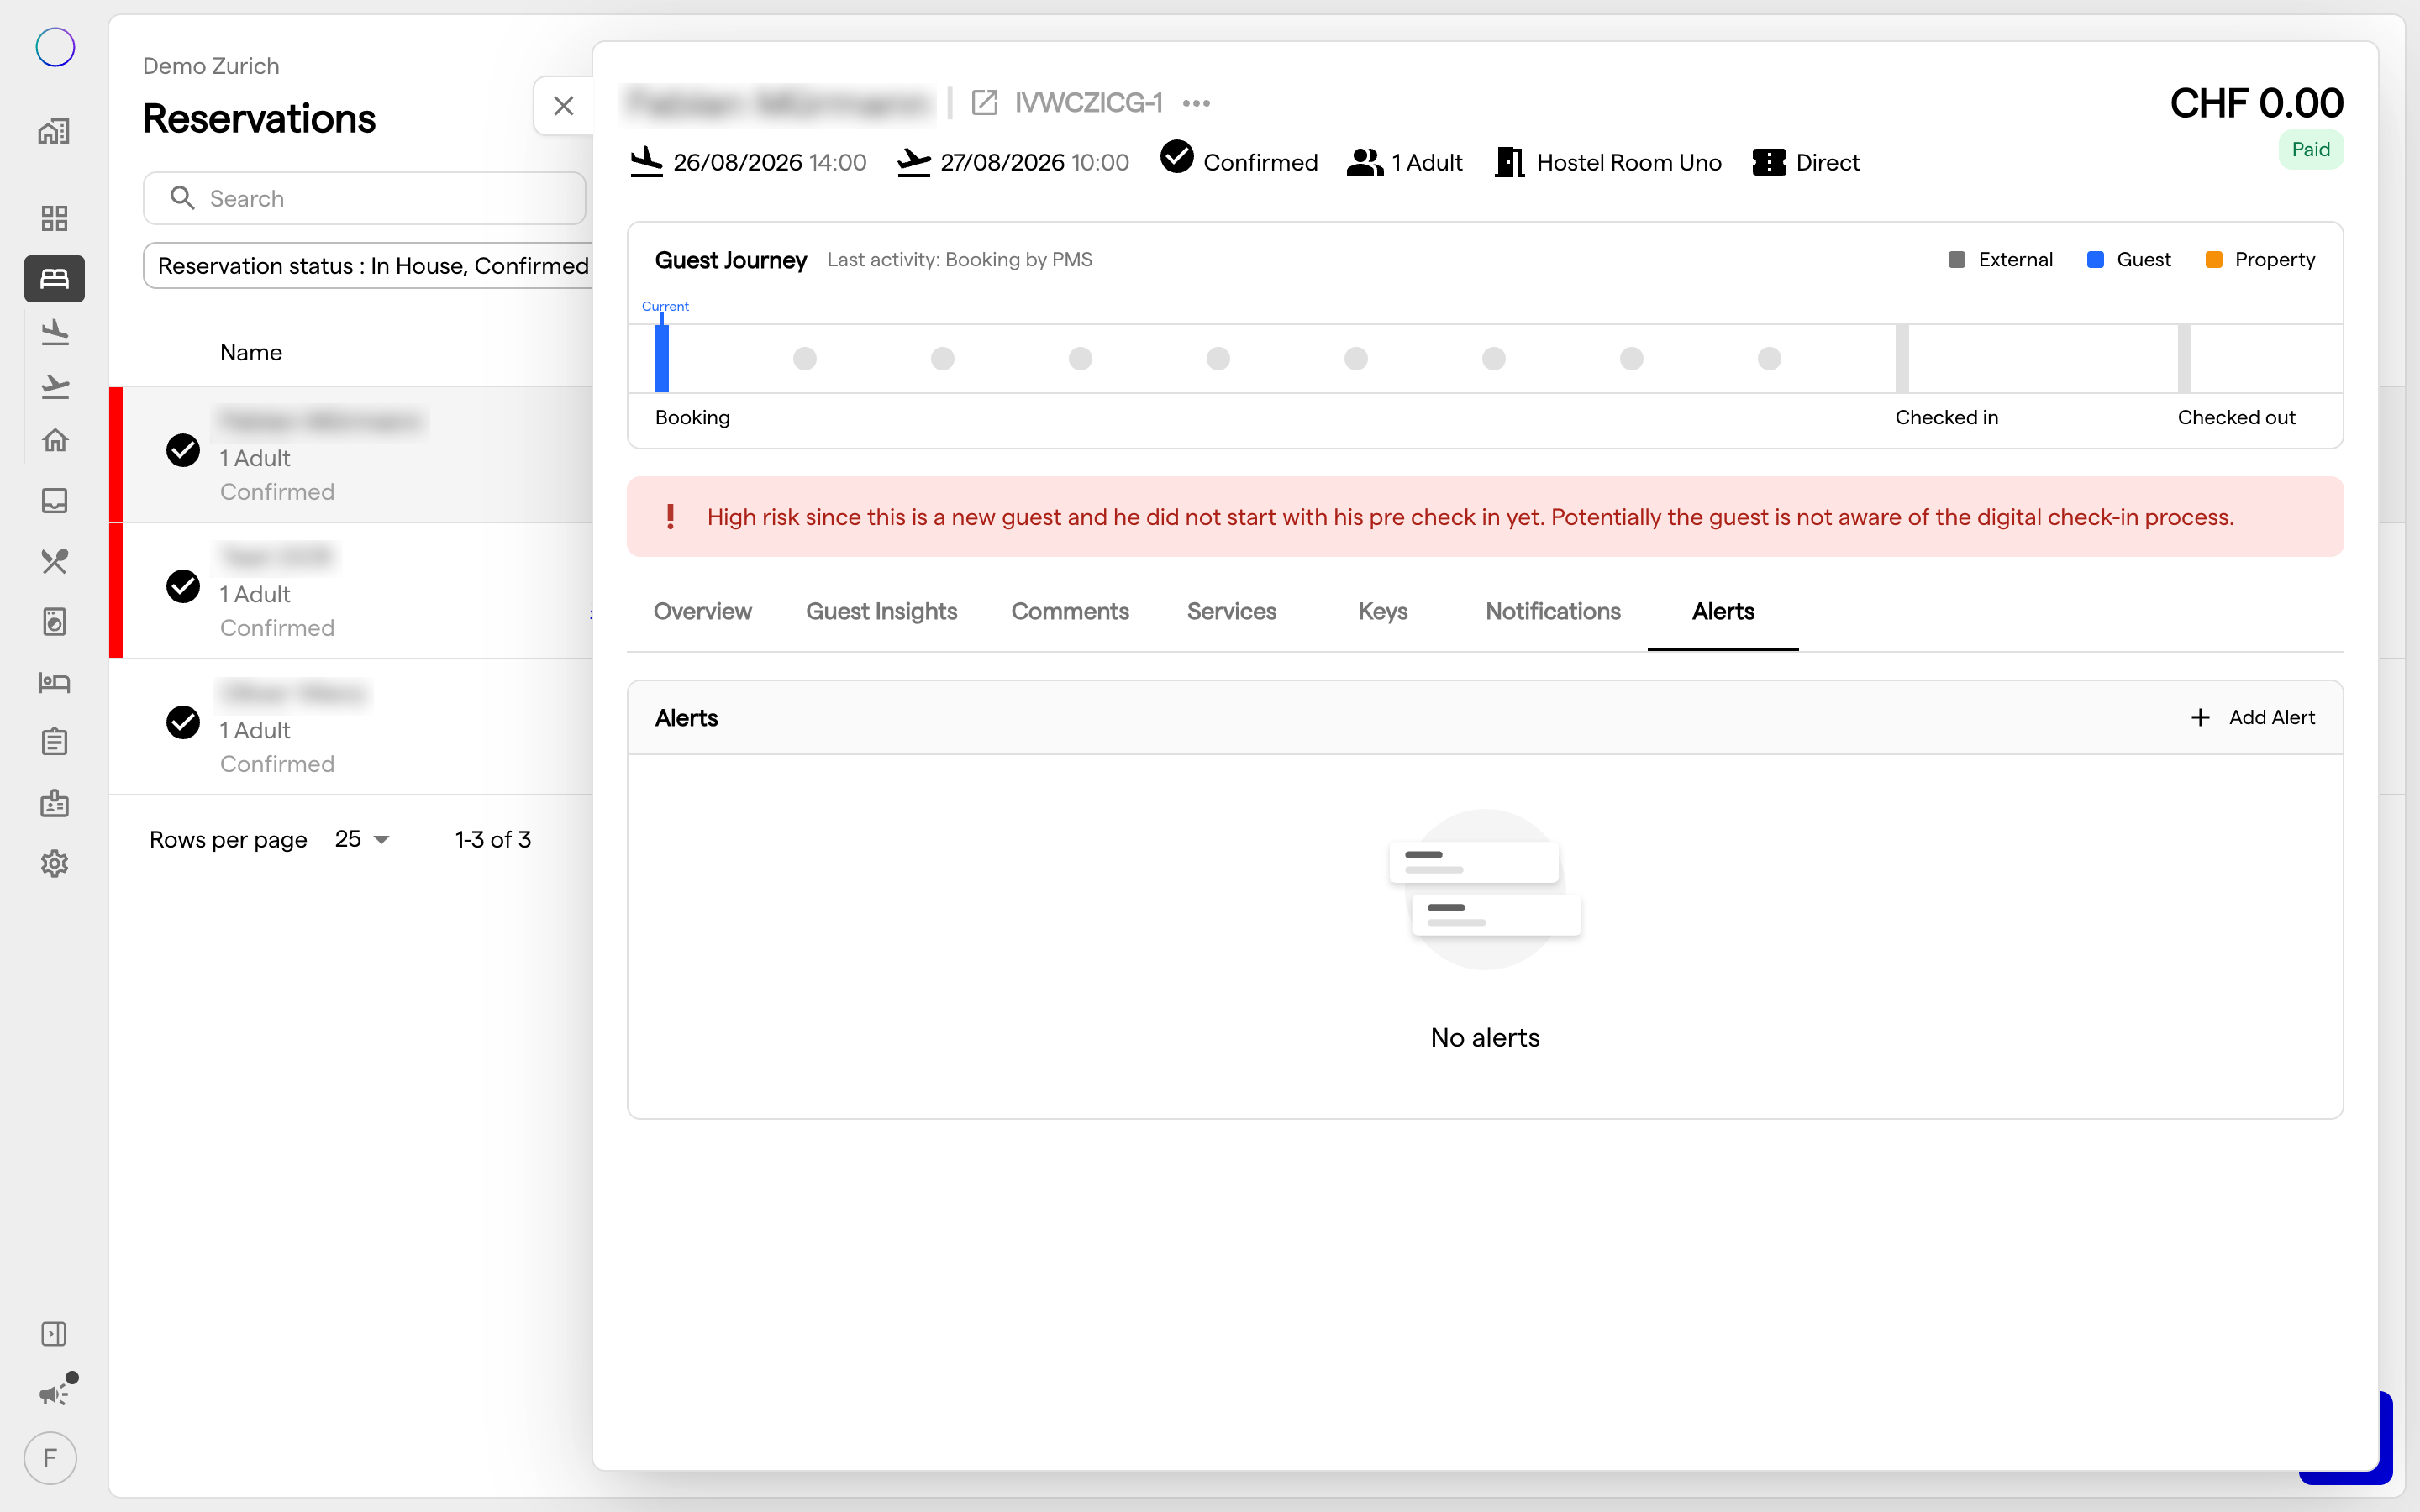
From the Reservation Details
- Open a reservation
- Navigate to the Alerts tab
The Alerts tab displays all alerts for the reservation in a table with the following columns:
- Title: short identifier for the alert
- Description: detailed message content
- Area: when the alert triggers
- Created at: date and time the alert was created
- Actions: edit or delete options
5. Adding an Alert
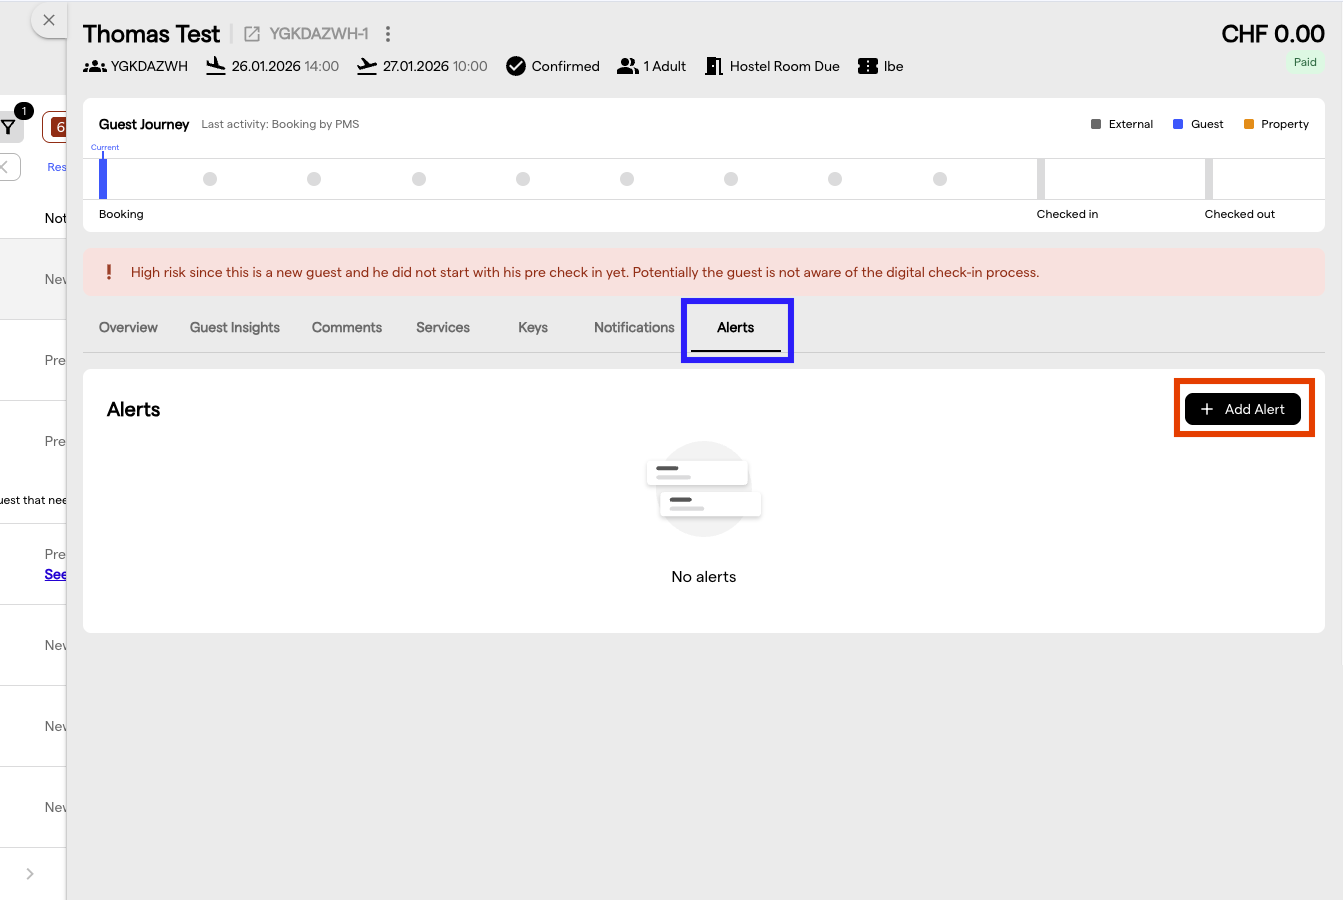
- Open the reservation
- Go to the Alerts tab
- Click Add Alert
- Fill in the alert details:
| Field | Required | Description |
|---|---|---|
| Alert Title | Yes | A short, descriptive name for the alert (e.g., "VIP Guest", "Late Checkout Approved") |
| Description | No | Detailed information for staff. Supports multiple lines for longer messages |
| Notification Area | Yes | Select when the alert should appear (see Alert Areas above) |
| Display Alert as Pop-Up | No | When enabled, the alert appears as a modal dialog that staff must acknowledge. When disabled, it appears as a notification banner |
- Click Create
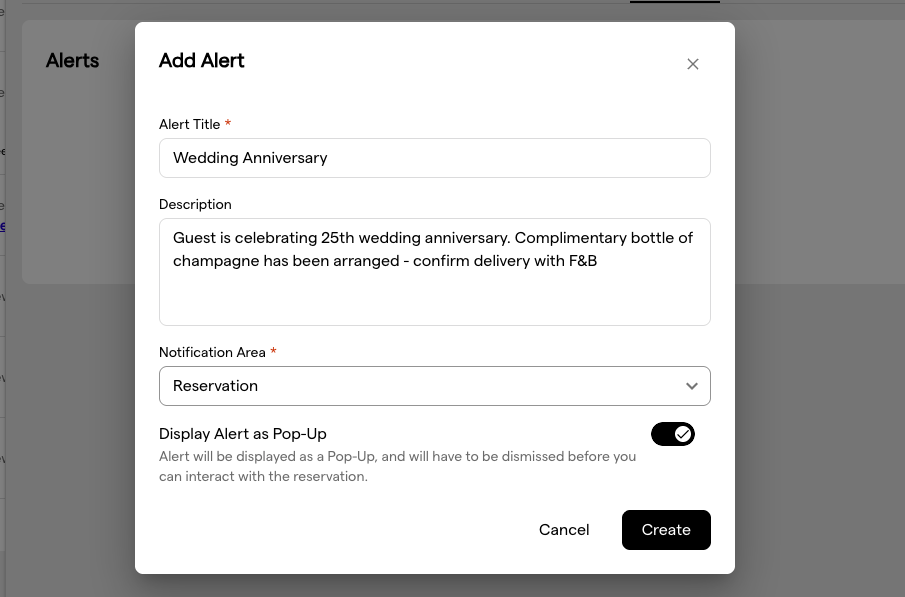
Best Practices for Alert Content
- Alert Title: keep it short and actionable (2 to 4 words)
- Good: "VIP, extra attention"
- Avoid: "This guest is a VIP and needs extra attention from all staff"
- Description: include specific details and instructions
- Good: "Guest is celebrating 25th wedding anniversary. Complimentary bottle of champagne has been arranged. Confirm delivery with F&B"
- Avoid: "Anniversary"
6. Editing an Alert
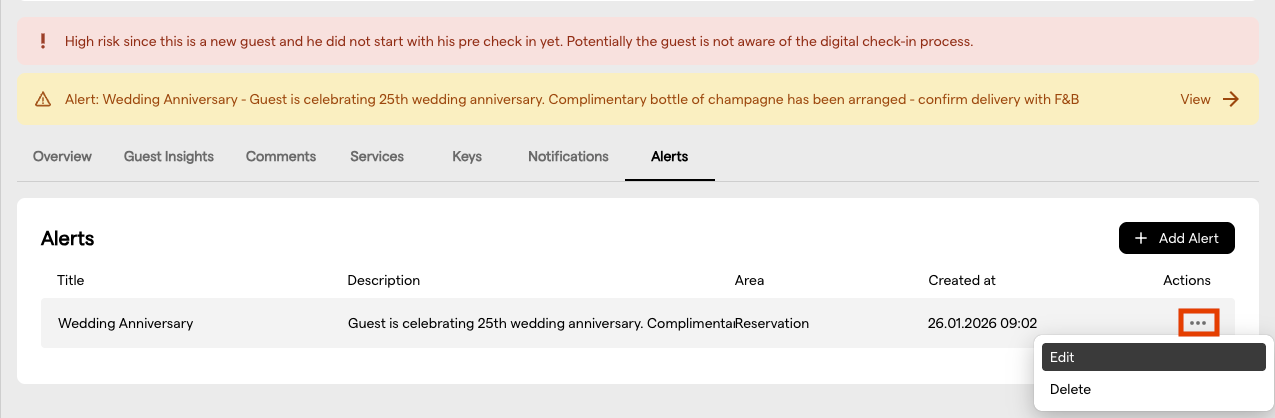
- Open the reservation
- Go to the Alerts tab
- Find the alert you want to edit
- Click the ⋮ (more actions) menu on the right
- Select Edit
- Update the alert details
- Click Edit to save changes
7. Deleting an Alert
- Open the reservation
- Go to the Alerts tab
- Find the alert you want to delete
- Click the ⋮ (more actions) menu on the right
- Select Delete
- Confirm the deletion in the dialog
Note: Deleting an alert cannot be undone.
8. How Alerts are displayed to Staff
Notification Banners
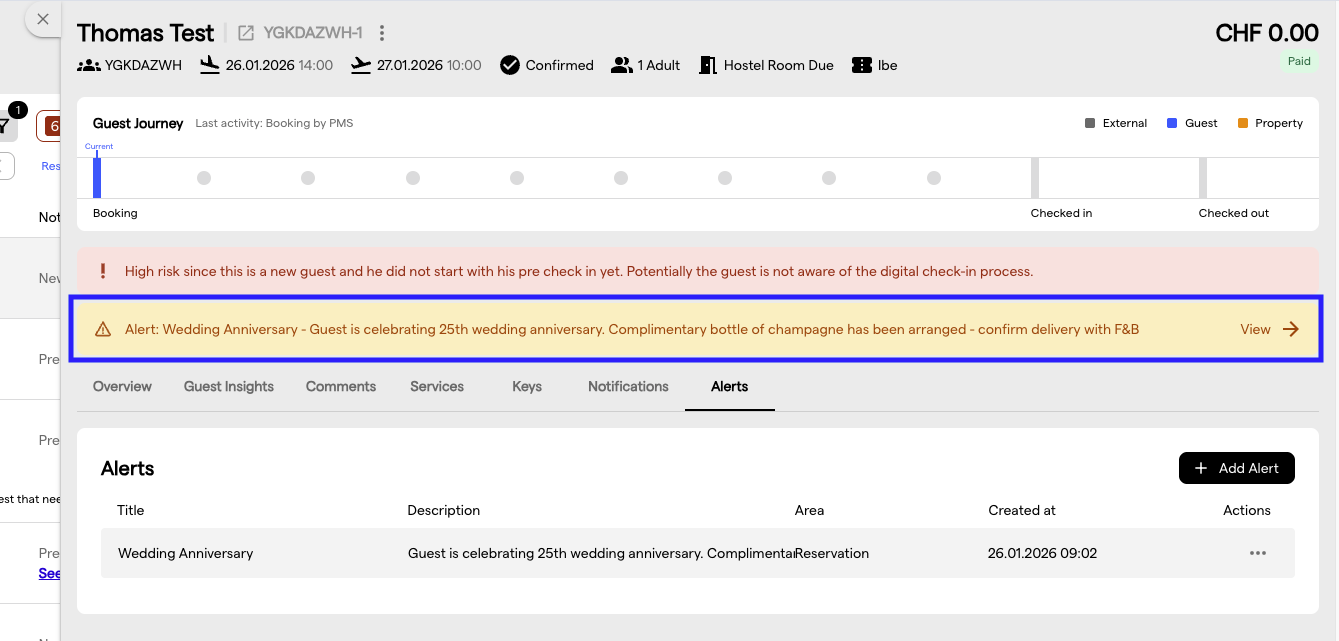
Every alert in a matching area appears as a warning banner at the top of the reservation, whether or not Display Alert as Pop-Up is on. The switch adds the pop-up, it does not replace the banner. Staff can click View to see the full alert details.
Pop-up Modals
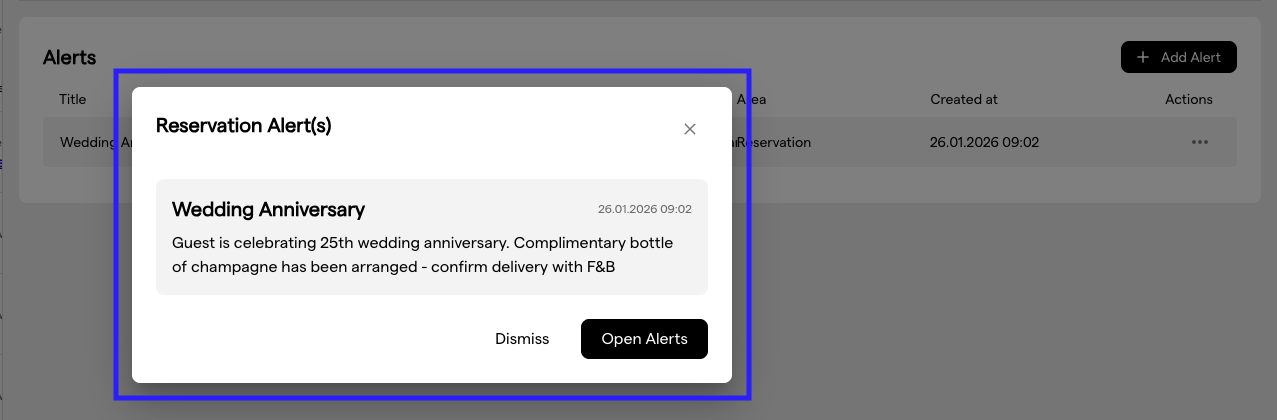
When Display Alert as Pop-Up is enabled, alerts automatically appear in a modal dialog when staff access the reservation at the appropriate time (based on the Area setting). The modal shows:
- Alert title
- Alert description
- Creation timestamp
Staff can either:
- Dismiss: close the modal and continue working
- Open Alerts: go straight to the Alerts tab to see all alerts
A pop-up is shown once per area. After a staff member dismisses it, it does not pop up again until they leave and return to the reservation, and no pop-up opens while they are already on the Alerts tab.
9. Multiple Alerts
A reservation can have multiple alerts with different areas. The system will:
- Show all relevant alerts based on the current reservation state
- Show every applicable pop-up alert together in one modal, and dismiss the pop-up for all of the areas it covered when that modal is closed
- Show all applicable notification banners simultaneously
10. PMS Synchronization (Oracle Opera Cloud)
If your property uses Oracle Opera Cloud (via OHIP) and PMS alert synchronization is enabled, alerts are synchronized bidirectionally between LIKE MAGIC and the PMS.
When PMS Sync is Enabled
- Alerts created in OPERA appear in LIKE MAGIC
- Alerts created in LIKE MAGIC appear in OPERA
- Changes sync automatically
Important (Title Field Behavior)
When PMS synchronization is enabled, the Alert Title field becomes read-only and is automatically set to "GEN", the standard Opera alert code.
You can still write the alert message in the Description field, which supports full text entry.
11. Frequently Asked Questions
Q: Can I create an alert that shows in multiple areas?
A: No, each alert is assigned to one area. If you need the same message to appear at multiple points, create separate alerts for each area.
Q: Why don't I see the Alerts tab?
A: Reservation alerts require Platform pricing and are enabled per property by LIKE MAGIC. On Core pricing the Alerts tab shows a lock and no alert banners or pop-ups appear at all. If the tab is missing entirely, request activation via a Support Ticket.
Q: Why is the Alert Title field disabled/greyed out?
A: If your property has PMS synchronization enabled with Oracle Opera Cloud, the Alert Title field is read-only and set to "GEN" for compatibility. Use the Description field for your alert message.
Q: Will guests see these alerts?
A: No, alerts are only visible to staff in the Operations Platform. They are not shown in guest-facing apps or communications.
Q: How long do alerts stay on a reservation?
A: Alerts remain on the reservation until they are manually deleted. They persist even after the guest checks out.
Q: Can I set an alert to expire automatically?
A: Alerts do not have an expiration feature. Delete alerts manually when they are no longer needed.
Q: Do alerts appear in the Check-In Wizard?
A: Yes, alerts with the Check-In area are displayed at the top of the Check-In Wizard.
12. Conclusion
Reservation Alerts help ensure important guest information reaches staff at the right moment. Use clear titles, choose the appropriate area, and regularly clean up outdated alerts to keep reservations organized. To have the feature enabled for your property, request it via a Support Ticket.